Bundle Deal: Windows 11 Pro & Office LTSC 2024 Pro Plus

In stock
Why Buy From Brytesoft
- Authentic Keys: Genuine Microsoft Windows and Office software at a fraction of retail, backed by dedicated support.
- Instant Delivery: Receive your keys within minutes upon purchase.
- Full Retail Editions: Enjoy complete versions of Windows 11 Pro and Office LTSC 2024 Professional Plus with 32-bit & 64-bit support and automatic updates.
- One-Time Purchase: Pay once, own both for life. No subscriptions, renewals, or hidden fees.
❗Note: Office LTSC 2024 requires activation by phone via the Office Deployment Tool. View detailed setup instructions here.
Windows 11 Pro & Microsoft Office LTSC 2024 Professional Plus Bundle
Unlock the full potential of your PC with this ultimate productivity bundle — Windows 11 Pro and Microsoft Office LTSC 2024 Professional Plus. Experience the perfect balance of performance, security, and professional-grade productivity tools, all at a fraction of the retail price. Whether you’re upgrading your home computer or outfitting your business, this bundle delivers everything you need to work smarter, faster, and more securely.
Buy Windows 11 Pro Keys: Enhance Your PC’s Performance
Windows 11 Pro introduces a sleek, modern interface with advanced performance and security enhancements. Designed to meet the demands of today’s users, it’s the ideal foundation for productivity and creativity. Enjoy improved multitasking, seamless Microsoft integration, and enterprise-grade protection — all in one powerful operating system.
- Full and unrestricted version
- No limit on duration of use
- Each activation permanently linked to your PC
- Reinstall anytime on the same device
- Supports both 64-bit and 32-bit systems
Buying your software is easy. Click “Buy Now,” and receive your genuine Microsoft key instantly via email. Activate directly with Microsoft and start enjoying the best of Windows 11 Pro.
Windows 11 Pro — Built for Home and Business
Windows 11 Pro is ideal for professionals and home users alike. Benefit from added features like BitLocker encryption, Windows Information Protection (WIP), Hyper-V virtualization, and remote desktop functionality. These tools offer unmatched control, productivity, and peace of mind whether you’re managing files, gaming, or running your business.
Gamers and Professionals Alike Will Love:
- DirectStorage API: Enjoy faster load times and smoother gameplay.
- Auto HDR: Enhanced color and lighting for supported games.
- Virtual Machine Support: Run multiple environments easily with Hyper-V.
- Group Policy Control: Manage multiple PCs efficiently.
Windows 11 Pro transforms the way you interact with your PC — beautifully designed, lightning-fast, and built with security in mind.
Learn more on how to download, install, and activate Windows 11 Pro here.
Microsoft Office LTSC 2024 Professional Plus: Elevate Your Work
Microsoft Office LTSC 2024 Professional Plus is engineered for professionals and organizations that demand reliability, power, and versatility. It offers the full suite of productivity tools — Word, Excel, PowerPoint, Outlook, Publisher, Access, and Teams — in a single, one-time purchase. Designed to work seamlessly on Windows 11 Pro, it delivers an unparalleled workflow experience.
Key Features:
- Real-Time Collaboration: Co-author, comment, and communicate effortlessly with your team.
- Enhanced Excel Tools: Gain data-driven insights faster with new formulas and AI-powered analytics.
- Dynamic PowerPoint: Build stunning, interactive presentations with enhanced animations.
- Smarter Outlook: Manage emails and schedules efficiently with improved organization tools.
- Advanced Security: Protect your data with Microsoft’s built-in privacy and compliance features.
- Customizable Interface: Personalize your workspace for improved focus and comfort.
- Cloud Connectivity: Save and access your work anywhere via OneDrive integration.
Note: Office LTSC 2024 Professional Plus is for Windows only and not available for macOS. For Mac, consider Office Home & Business 2024.
Installation and Activation
Office LTSC 2024 is activated by phone via the Office Deployment Tool (ODT). For step-by-step instructions, visit our guide here.
Why Buy This Bundle From Brytesoft?
- Authentic Keys: 100% genuine Microsoft products at discounted rates, verified and guaranteed.
- Instant Delivery: Receive your activation keys within minutes of purchase.
- Full Retail Editions: Complete, unrestricted software for both Windows 11 Pro and Office LTSC 2024.
- One-Time Purchase: Pay once and own both for life — no subscriptions, no renewals.
- Dedicated Support: Step-by-step installation guides and a responsive support team always ready to help.
We’re proud to maintain a 4.7-star rating on Trustpilot — a testament to our commitment to quality, service, and customer satisfaction.
With Brytesoft’s Windows 11 Pro + Office LTSC 2024 Professional Plus Bundle, you get everything you need to power your PC, streamline your workflow, and secure your data — all with genuine Microsoft software.
Own it once. Enjoy it for life.
Before you install Windows 11, make sure your configuration meets the hardware requirements. The latest version of Microsoft's operating system requires TPM 1.2 (preferably version 2.0) and the Secure Boot mode. Security reasons dictate these requirements. So remember that not all components meet Microsoft's requirements for compatibility with the new operating system.
Before installation, you should check to determine whether the motherboard is supported by Windows 11 and that the processor is compatible with Windows 11. Then, you can check whether your computer meets them in Windows Update (Settings > Updates and security). You'll get a message there confirming Windows 11 compatibility. To upgrade, you must have Windows 10 version 2004 or later.
Option 1: Performing a clean installation of Windows 11 Pro
Please proceed with this when you are currently using an older Windows version than Windows 11 or a PC without an operating system
1. Preparing Your Device
Before starting the installation, it is necessary to complete several important steps to prepare your device. This will help ensure a smooth installation process and minimize the risk of data loss.
System Requirements for Windows 11 Pro
Before beginning the Microsoft Windows 11 Pro downloading process, it is crucial to ensure that your device meets the minimum system requirements for Windows 11 Pro. Below is a list of key requirements:
- Processor: 1 gigahertz (GHz) or faster with two or more cores on a compatible 64-bit processor or System on a Chip (SoC)
- RAM: 4 GB
- Storage: 64 GB or larger storage device
- System firmware: UEFI compatible, with Secure Boot support
- TPM: Trusted Platform Module (TPM) version 2.0
- Graphics card: DirectX 12 compatible or later with WDDM 2.0 driver
- Display: High-definition display (720p) larger than 9″ diagonally, 8 bits per color channel
If your device meets these requirements, you can proceed to the next steps in preparing for the Windows 11 Pro ISO download.
You can also check compatibility using Microsoft’s PC Health Check application.
Backing Up Data
Remember to create a backup of all significant files and data before beginning the installation. Although the installation process usually proceeds smoothly, there is always a risk of data loss.
After completing these preparation steps, you will be ready to proceed with downloading and installing Windows 11 Pro.
2. Download Windows 11 Pro
Downloading the Windows 11 Pro installation files is the first step in the installation process. Here’s what you need to do:
- Navigate to the official Microsoft website and locate the Windows 11 Pro download page.
- Click the “Download” button and select your preferred language.
- Download Windows 11 Pro ISO file on your device or create a bootable USB drive using Microsoft’s Media Creation Tool.
Once you have successfully downloaded the installation files, you will be ready to proceed with the installation process itself.
3. Download Windows Media Creation Tool directly from Microsoft:
https://go.microsoft.com/fwlink/?linkid=2156295
Windows 11 Media Creation Tool is a program with which you can create installation media quickly and easily for creating a Windows 11 installation image. With it, you can upgrade your current system to the latest version and create a DVD or USB stick with the installer. The whole thing is automated and straightforward to use.
The application does not require installation. After launching, it offers two options: updating the current system and downloading files to create installation media. Windows 11 Media Creation Tool allows you to both download files and save them to your computer in the form of an ISO image, as well as automatically prepare a bootable USB flash drive or DVD. The whole procedure of downloading and saving runs automatically, but it is necessary to prepare at least 8 GB of media in advance.
4. Run the Media Creation Tool
- Create installation media for another PC
- Select preferred language
- Select Edition: Windows 11 (it includes both, Pro and Home)
- Select architecture (64-bit or 32-bit)
- Select the media you want to create (USB flash drive or ISO file to create a DVD)
5. Perform a clean installation
With the installation files downloaded and your device prepared, you can begin the Windows 11 Pro installation. Follow these steps:
- Insert the bootable USB drive or mount the ISO file. Ensure that the USB drive is securely connected to a functioning USB port or that the ISO file is properly mounted in your virtual drive software.
- Restart your computer and enter the BIOS to configure booting from the USB or ISO. The key to access BIOS varies by manufacturer, but common options include F2, F12, or Del — consult your device manual if unsure.
- Follow the on-screen instructions to select the language, accept the license agreement, and configure installation settings. Take your time to read through each option carefully to ensure you're setting up Windows 11 Pro according to your preferences.
- Choose “Custom install” and specify the partition for installing Windows 11 Pro. If you're upgrading from a previous version of Windows, consider creating a backup of your important files before proceeding with this step.
- Wait for the installation process to complete, which may take some time. During this period, your computer may restart several times — this is normal and part of the installation process.
- After the installation is complete, Windows 11 Pro will be ready for use. However, to fully utilize the system, you will need to activate it using a valid product key.
Option 2: Upgrading from Windows 11 Home to Pro
Windows 11 Home to Pro Upgrade is an upgrade that will give you access to many valuable features, mobile management (MDM), and group management options in collaboration with the cloud and Windows Server. You'll also be able to publish and download applications from the Microsoft Store for Business, grant user access, enable kiosk mode, and manage updates through Windows Update for Business. Please proceed with the following steps when you are currently using Windows 11 Home and want to upgrade to Pro.
1. Press the "Windows key" + "R", type "slui.exe" and hit "Enter"
2. Enter your Windows 11 Pro product key. If it's not accepted, apply the default product key: "VK7JG-NPHTM-C97JM-9MPGT-3V66T"
If error code "0x800f0805" appears after applying the default product key, please make sure that you have at least 20 GB of free disc space and that Windows is updated to it's latest version. If those two points apply to you, it is obvious that some important system files are missing. In that case it is necessary to perform a clean installation (see Option 1).
3. Go to "System" - "About" and "Change product key" (Click "Yes", if User Account Control comes up)
4. Enter your Windows 11 Pro product key and make sure all open applications are closed and your work is saved, then start the upgrade.
Wait while the upgrade process kicks off - your computer will be restarted several times throughout this process. The amount of time the upgrade takes will vary between operating systems. But in our experience, it only takes 5 to 10 minutes.
Finally, you have to configure the Windows 11 Pro system. In this process, you decide on, for example, the sending of diagnostic data and privacy settings. Select what you think is appropriate. Don't worry - you can change these preferences any time after installation.
Troubleshooting
Unable to Select Windows 11 Pro During Clean Installation?
If you're unable to select the Pro edition of Windows 11 during a clean installation, it is usually due to your system's pre-existing configuration or the way the installation media was created. Below is a step-by-step guide to address this issue.
-
Open Notepad (or any basic text editor) and add the following lines to the new document:
[Channel] Retail [VL] 0 -
Click File > Save As:
- In the Save As dialog:
- Set the File name as ei.cfg.
- In the Save as type dropdown, select All Files.
- Ensure the file is saved with the .cfg extension (not .txt).
-
Save the file in the
\sourcesfolder on your installation media and retry the installation.
How do I fix error code 0xc004c060?
-
Run Command Prompt as Administrator:
- Press
Win + S, type cmd, and right-click on Command Prompt. - Select Run as administrator.
- Press
-
Delete the Pre-installed License Key:
- In the Command Prompt, type the following command to delete the current product key:
slmgr /upk - Press Enter. You should see a message confirming the uninstallation of the product key.
-
Clear the License Information from the System:
- Run the following command to clear the residual license data:
slmgr /cpky - Press Enter.
-
Enter the New Product Key:
- Input the new product key using this command:
slmgr /ipk <NEW_PRODUCT_KEY> - Replace
<NEW_PRODUCT_KEY>with the new license key provided. -
Activate the License Key:
- Activate the key by running the following command:
slmgr /ato - Press Enter. This will attempt to activate the product key online.
-
Verify Activation Status:
- To check if the activation was successful, run:
slmgr /dlv - Press Enter. A detailed licensing information window will appear. Look for the status indicating that Windows is activated.
How do I fix error code 0xc004f050?
Follow the steps below to resolve error code 0xc004f050:
- Disconnect your device from the internet.
- Press Windows key + I, navigate to System > Activation > Change product key.
-
Enter the generic key below to upgrade to Windows 11 Pro:
VK7JG-NPHTM-C97JM-9MPGT-3V66T - Once the system has been upgraded to Windows 11 Pro, reconnect to the internet and use your valid Windows 11 Pro product key to activate the system.
- If upgrading does not work, please try a fresh installation.
How to Download, Install, and Activate Microsoft Office LTSC 2024 Professional Plus
Microsoft Office LTSC 2024 Professional Plus is the latest perpetual version of Office, designed for both everyday users and organizations that prefer a stable, one-time-purchase version of Office. It includes classic, fully installed versions of Word, Excel, PowerPoint, Outlook, and other core apps — without the need for a Microsoft 365 subscription. Before you download Microsoft Office 2021 Professional Plus, it’s crucial to ensure your computer meets the minimum system requirements.
System Requirements for Installing Microsoft Office LTSC 2024 Professional Plus on Windows
| Requirement | Details |
|---|---|
| Operating System | Windows 10 or Windows 11 (LTSC is not supported on Windows 8/7 or macOS) |
| Processor | 1.6 GHz or faster, dual-core (x64) |
| RAM | 4 GB or more |
| Disk Space | Minimum 4 GB of free space |
| Display | 1280 × 768 resolution |
| Internet | Broadband internet (20 Mbps recommended for download) |
| Graphics | DirectX 9 or later, with WDDM 2.0 driver (for GPU acceleration) |
Note: Office LTSC 2024 Professional Plus is not available for macOS. Mac users can consider Office Home & Business 2024.
✅ What You Need
| Item | Description |
|---|---|
| Admin Privileges | Required to install Office via command prompt |
| Internet Connection | Required for downloading Office installation files |
| Office Deployment Tool | Free utility from Microsoft used to deploy and install Office |
| Basic Command Prompt Usage | You’ll be running a few simple commands during installation |
How to Uninstall the Previous Version of Microsoft Office
The Uninstallation Process for Windows Users
- Open the “Control Panel”.
- Select “Programs and Features”.
- Find Microsoft Office in the list, right-click, and select “Uninstall”.
- Follow the uninstallation wizard instructions.
Note: The process may take several minutes, depending on your computer’s configuration.
System Restart
After uninstallation, be sure to restart your computer. This will help complete the uninstallation process and prepare the system for installing the new version of Office.
How to Install Microsoft Office LTSC 2024 Professional Plus on Windows
Step 1: Download the Office Deployment Tool (ODT)
What is it?
The Office Deployment Tool allows you to download and install Office using a custom setup file.
- Go to the Microsoft ODT Download Page
- Click Download.
- Create a new folder in your C: drive called Office2024Setup (e.g., C:\Office2024Setup).
- Then, run the downloaded file and select that folder as the destination when asked where to extract the files.
✅ You should see: setup.exe and sample XML files
❌ You may not see an EULA.txt file — that’s normal.
Step 2: Create a Configuration File
- Open Notepad
- Paste the following code:
<Configuration>
  <Add OfficeClientEdition="64" Channel="PerpetualVL2024">
    <Product ID="ProPlus2024Volume" PIDKEY="XXXXX-XXXXX-XXXXX-XXXXX-XXXXX">
      <Language ID="en-us" />
    </Product>
  </Add>
  <RemoveMSI />
  <Display Level="None" AcceptEULA="TRUE" />
  <Property Name="AUTOACTIVATE" Value="1" />
</Configuration>
Replace the placeholder with your actual product key.
Then go to File > Save As:
- File name:
configuration.xml - Save as type:
All Files - Encoding:
UTF-8
Step 3: Install Office 2024
- Open Command Prompt as Administrator
- In the Command Prompt window, run the command below to go to the folder where you saved the setup files
cd C:\Office2024Setup
⚠️ Note: If you saved the setup files in a different folder (e.g., Downloads or Desktop), replace the path accordingly. - Still in the Command Prompt, start the installer by typing this command:
setup.exe /configure configuration.xml
⚠️ Note: This command must be run inside Command Prompt and only works when you're in the correct folder where bothsetup.exeandconfiguration.xmlare located.
⚠️ Note: You won’t see a typical installer window. It may look like nothing is happening — but Office is downloading and installing silently in the background.
✅ Installation is complete when:
- The command prompt returns to a blinking cursor and when CMD prompt returns to showing 'C:/Office 2024 Setup' (or whatever folder you chose).
- Office apps appear in the Start Menu
- You can launch Word, Excel, etc.
Step 4: Activate by Telephone
- Open any Office app
- The Activation Wizard will launch
- Select “I want to activate the software by telephone” and click Next
- Choose your country/region and call the number provided
- Provide the Installation ID and get a Confirmation ID
- Enter the Confirmation ID and click Next
✅ Office will now be fully activated and functional. No Microsoft account required.
Summary
| Step | Action |
|---|---|
| 1 | Download and extract the Office Deployment Tool |
| 2 | Create a custom configuration.xml file |
| 3 | Run setup.exe /configure configuration.xml via Command Prompt |
| 4 | Activate Office by telephone |
Troubleshooting Installation & Activation Issues
If you encounter errors during installation or activation, please refer to the following common issues and their solutions:
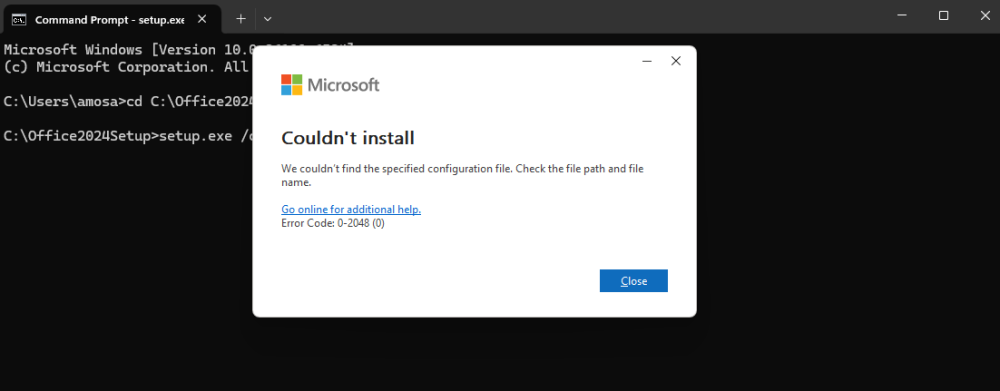
1. “Couldn't install. We couldn't find the specified configuration file. Check the file path and file name.”

Cause: This error usually occurs if Command Prompt wasn’t run as Administrator or if the folder path was entered incorrectly.
Solution:
- Ensure you open Command Prompt as Administrator.
- Verify the folder name and path — for example, if your setup files are in
C:\Office2024Setup, the first command should be:cd C:\Office2024Setup - Make sure both
setup.exeandconfiguration.xmlexist in the same folder.
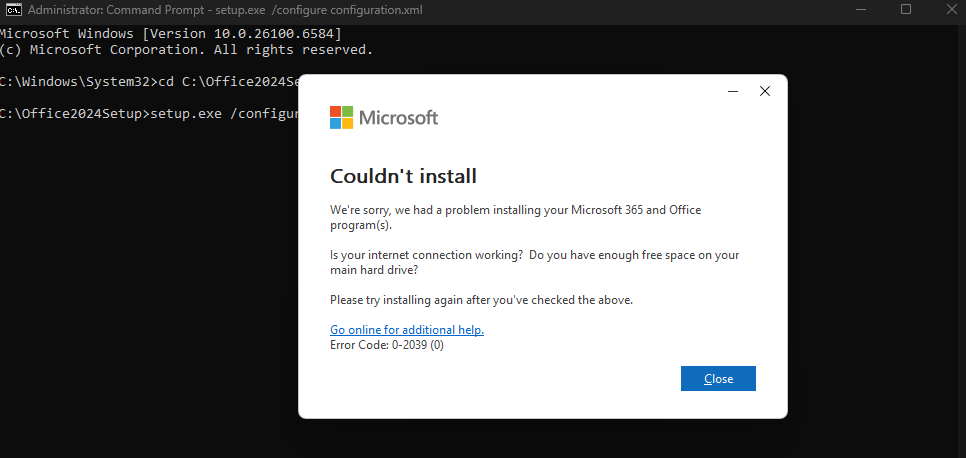
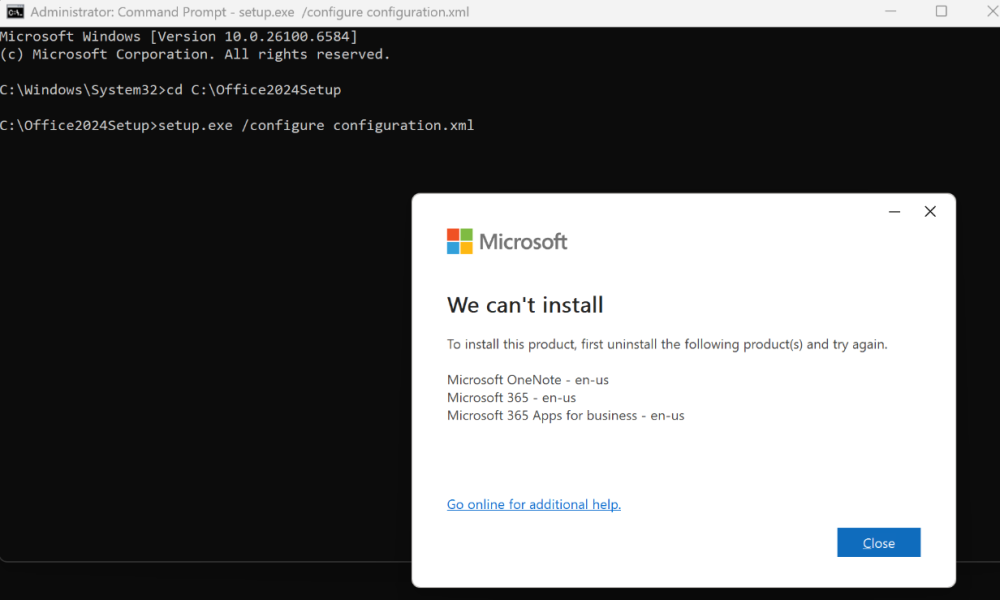
2. “Couldn't install. We're sorry, we had a problem installing your Microsoft 365 and Office program(s).”

or “We can't install. To install this product, first uninstall the following product(s) and try again.”

Cause: Remnants of previous Office editions or OneNote may still be present, preventing the LTSC 2024 installation from proceeding.
Solution: Perform a clean removal and reinstallation:
- Use the built-in Microsoft Get Help app:
Press Windows + S, type Get Help, and open the app.
In the search box, type Uninstall Office and follow the guided steps to fully remove previous Office installations. - If prompted, restart your PC when the process completes.
- Delete residual Office folders manually (after restart):
C:\Program Files\Microsoft OfficeC:\Program Files (x86)\Microsoft OfficeC:\ProgramData\Microsoft\Office
- Check for remaining Microsoft 365 Apps or OneNote installations:
- Go to Settings → Apps → Installed Apps (or Control Panel → Programs and Features).
- If you see any entries for Microsoft 365 Apps or OneNote, uninstall them — they can automatically reinstall older components.
- Restart your PC again, then proceed with a fresh Office LTSC 2024 installation.
System Requirements
Before installing the Windows 11 Pro and Microsoft Office LTSC 2024 Professional Plus bundle, please ensure your device meets the following minimum requirements.
For Windows
| Component | Requirement |
| Processor | 1 GHz or faster processor with 2 or more cores on a compatible 64-bit processor or System on a Chip (SoC) |
| Operating System | Windows 11 Pro (required for Office LTSC 2024 Professional Plus) |
| Memory | 4 GB RAM (minimum); 8 GB RAM recommended for best performance |
| Storage | 64 GB or larger storage device (for Windows 11 installation) + 4 GB of available space for Office installation |
| System Firmware | UEFI, Secure Boot capable |
| TPM | Trusted Platform Module (TPM) version 2.0 required |
| Graphics | DirectX 12 compatible graphics / WDDM 2.x driver |
| Display | High definition (720p) display that is greater than 9” diagonally, 8 bits per color channel |
| Internet Connection | Internet connectivity required for activation, updates, and Office installation via ODT |
Additional Notes
- This bundle is designed exclusively for Windows devices — Office LTSC 2024 Professional Plus is not compatible with macOS.
- Windows 11 Pro must be installed and activated prior to Office LTSC 2024 installation for optimal compatibility.
- For best performance, use SSD storage and ensure your device drivers are fully updated.


